Tampilkan postingan dengan label vegetarian. Tampilkan semua postingan
Roasted Garlic and Potato Dip Recipe

Roast garlic is sweet and soft and most important, mellow. It won't overpower most dishes like this skordalia inspired dip made with potatoes, extra virgin olive oil, lemon juice and roast garlic, instead of raw. Not only is this dip good for Passover, it's vegetarian (vegan if you use vegan mayo) and gluten free! That is if you use a gluten free mayonnaise, which adds additional creaminess to the dip.
I have been experimenting with "roasting" garlic in the microwave oven, but whatever technique you want to use is fine. The main thing is not to overcook it. It should be soft and creamy but not too darkly caramelized. I use 3-4 cloves, but feel free to use as much as you like. Serve it with fresh vegetables for dipping.
Roasted Garlic and Potato Dip
1 russet potato
4 cloves roasted garlic (use any method you like)
1/4 cup extra virgin olive oil
3 Tablespoons mayonnaise
1 teaspoon freshly squeezed lemon juice
Water
Salt
Bake or microwave the potato until thoroughly cooked. You are not going to use the skin so however you prefer to cook it is fine. When cool enough to handle, slice open and scoop the potato out of the skin. Place the potato in a bowl with the garlic cloves and mash. Mix in the olive oil, mayonnaise and lemon juice. Add enough water to make a thick dip. Season to taste with salt.
Enjoy!
Bok Choy Salad Recipe

As luck would have it, at a Chinese New Year's dinner I stumbled upon a terrific dish at Fang restaurant. It was served raw, as a salad with a soy and sesame vinaigrette alongside some chunks of short rib. Bok choy is very mild flavored but it has great texture. The leaves are tender and somewhat herbal without being bitter, and the stems are very juicy and crisp. I had never considered using bok choy in salad but after trying that dish, I couldn't stop thinking about it.
Looking around online I found plenty of Asian inspired recipes for bok choy salad, and a few takes on coleslaw and even a chopped salad. My idea was to make a more Italian style salad using extra virgin olive oil, lemon juice and Parmigiano Reggiano. The result is a salad at once familiar and yet fresh. It's a great choice for a potluck or dinner party, because it is very sturdy and won't easily wilt. You could mix in other greens, add cherry tomatoes or even fresh fava beans when in season.
Bok Choy Salad
1 serving (multiply for as many servings as you like)
Ingredients
1 cup sliced bok choy
1/2 teaspoon fresh lemon juice
1 teaspoon extra virgin olive oil
Salt
Parmigiano reggiano, preferably young less than 18 months
Croutons
Freshly ground pepper
Instructions
Toss the bok choy in a bowl with the lemon juice and olive oil and a tiny pinch of salt. Shave long strips of Parmigiano using a vegetable peeler and add those and about five or so croutons to the bok choy. Season with pepper before serving.
Enjoy!
More inspiring bok choy salad recipes:
Bok Choy and Avocado Salad
Thai Steak and Bok Choy Salad
Bok Choy Salad with Corn & Edamame
Turkey Bacon & Bok Choy Salad with Shaved Parmesan (chopped salad style)
Bok Choy with Sesame Soy Vinaigrette
Bok Choy Salad (with ramen noodles and almonds)
Crunchy Bok Choy Slaw (like coleslaw)
Smoky Tomato Soup Recipe

While I wouldn't use a canned tomato on a sandwich, they are a must for most tomato based sauces. Lately I've come to appreciate canned fire roasted tomatoes for their lovely smoky flavor. They are great in stew or chili and a sneaky shortcut when making this zippy soup. A nice option in this shoulder season when somedays still feel like Winter, it's something you can make from pantry staples--a few aromatics, cans of tomatoes and broth. Having tried many brands of fire roasted tomatoes, I like Hunt's best and while I prefer homemade, Swanson's is the only canned chicken broth I use.
Another little trick in this soup is the addition of cream cheese. I don't typically keep heavy cream on hand so I am always looking for other ingredients to add creaminess to recipes. In this case a tiny bit of cream cheese adds a lot of richness. But in all honesty this soup is really wonderful even without it.
Smoky Tomato Soup
Serves 4-6
Ingredients
2 Tablespoons olive oil
1 medium onion, diced
1 medium carrot, diced
2 cloves garlic, minced
1/2 teaspoon smoked paprika
2 14.5 ounce cans fire roasted tomatoes
2 14.5 ounces chicken broth (or homemade)
2 Tablespoons cream cheese, optional
Instructions
Heat a soup pot over medium heat. Add the onions and carrots and cook, stirring frequently for 8 minutes or until soft and golden, but not brown. Add the garlic and cook another minute. Add the smoked paprika and stir until fragrant, about 30 seconds. Add the tomatoes and broth and bring to a boil. Lower heat and simmer for 30 minutes, or until fairly thick and saucy.
Add the cream cheese if desired. Blend the soup in batches or use a hand blender. When the soup is smooth, it's ready to serve.
Enjoy!
Quinoa Salad with Feta and Dill Recipe

I've very excited to announce I will be doing a cooking demo during Macy's Flower Show in San Francisco on March 30th at 2 pm. I'll be sharing some recipes for jazzing up your sack lunch. So skip the sandwiches! This fresh and hearty salad is healthy and inexpensive to make and might make your co-workers jealous. Better bring some to share!
Quinoa is kind of like a blank canvas, it doesn't have much flavor or texture. It has protein but to be satisfying I think you need more variety. A little bit of feta and chickpeas add more protein and creamy textures. Originally I was trying to make a Greek inspired salad, but I didn't want to add salty olives and I found it was a little bland. Fresh dill and lemon really add some zest to it. I also used English cucumbers which are available all year round.
I do have a few tips for making this salad, for one, always remember to rinse quinoa before you cook it. It is very bitter otherwise. Also I use less water than the package suggests, I find 1 and 1/2 cups of liquid is plenty for 1 cup of quinoa. Finally serve this salad at room temperature. It keeps well in the refrigerator but doesn't taste quite as delicious when it's chilled so just take it out a half an hour or so before serving it.
Quinoa Salad with Feta and Dill
Makes 4 servings
Ingredients
1 cup quinoa
1 cup canned chickpeas, rinsed
1 cup English cucumber, diced
1 cup feta, crumbled
3 Tablespoons chopped fresh dill
1/3 cup green onions, minced
3-4 Tablespoons fresh lemon juice
Freshly ground pepper to taste
Instructions
Rinse the quinoa under cold water then cook according to package instructions. Remove from heat and fluff with a fork. Let quinoa cool to room temperature.
In a large bowl, combine quinoa, chickpeas, cucumber, feta, dill, green onions and lemon juice. Add plenty of fresh ground pepper then taste for seasoning. Serve at room temperature. Keeps for up to 3 days in the refrigerator
Enjoy!
Quinoa Salad with Feta and Dill
Makes 4 servings
Ingredients
1 cup quinoa
1 cup canned chickpeas, rinsed
1 cup English cucumber, diced
1 cup feta, crumbled
3 Tablespoons chopped fresh dill
1/3 cup green onions, minced
3-4 Tablespoons fresh lemon juice
Freshly ground pepper to taste
Instructions
Rinse the quinoa under cold water then cook according to package instructions. Remove from heat and fluff with a fork. Let quinoa cool to room temperature.
In a large bowl, combine quinoa, chickpeas, cucumber, feta, dill, green onions and lemon juice. Add plenty of fresh ground pepper then taste for seasoning. Serve at room temperature. Keeps for up to 3 days in the refrigerator
Enjoy!
Walnut Mushroom Casserole Recipe

When I was growing up, my parents took me and my sister to all kinds of restaurants but rarely ones with "kid's menus." We regularly came into San Francisco to eat Chinese food, tried sushi long before it became popular, and celebrated birthdays and school graduation at fancy French restaurants. Unlike many kids who probably longed for Taco Bell or McDonald’s, I enjoyed eating at The Good Earth, a casual restaurant near my house. The menu had a mix of salads and sandwiches and some very unique entrees. It wouldn’t necessarily be considered “health food” by today’s standards but there were quite a number of vegetarian dishes.
At The Good Earth, pretty much anyone could find something they would like to eat, and that made it perfect for dining out with everyone from my teenage girlfriends, to my grandmother. The Good Earth was famous for it’s spicy cinnamon tea which you can buy to this day. Although the restaurant chain was sold and very few restaurants remain, I remain haunted by the memory of Walnut Mushroom Casserole. It was my go to dish.
I like to think of myself as fairly adventurous, but really, when I find one dish I love, I have a hard time straying beyond it on any menu. The Walnut Mushroom Casserole at The Good Earth restaurant was my absolute favorite. It’s still on the menu at just one remaining restaurant in Southern California. Here is the dish description:
Walnut Mushroom Casserole spinach fettuccini tossed with broccoli, mushrooms, onion and water chestnuts, blended with sour cream and sherry sauce. topped with two cheeses, walnuts and scallions
I found a recipe online but it didn't seem right to me, so I adapted it as best I could to fit with my memory of it. I used Al Dente spinach fettuccini and it was perfect. I also tested out Al Dente's bonachia spinach fettuccine, and that worked great too. Note: Do not overcook the pasta!
Walnut Mushroom Casserole
Serves 6
Ingredients
2 Tablespoons olive oil, divided
1 cup walnuts, coarsely chopped
1 medium onion, cut into quarters and thinly sliced
1/2 lb small button mushroom, halved or quartered into small chunks
3 cups thinly sliced broccoli, stems and bite-sized florets
8 ounce can sliced water chestnuts
1 clove garlic, minced
2 Tablespoons sherry
2 Tablespoons soy sauce
1/2 cup + 2 Tablespoons sour cream
6 ounces dry spinach fettuccini (such as Al Dente brand), cooked until barely tender
1 cup shredded monterey jack cheese
1 cup shredded cheddar cheese
Instructions
Preheat oven to 375 degrees.
Heat a large skillet over low heat, add walnuts and stir until lightly toasted and fragrant, then remove and reserve the nuts and return the skillet to the stove.
Add one tablespoon oil to the hot skillet and the onions and mushrooms and cook until just beginning to brown, remove with a spoon and reserve. Add the remaining tablespoon of oil to the pan and the broccoli and sauté until crisp-tender, about 8 minutes. Stir in the reserved onions, mushrooms, water chestnuts, garlic and spinach fettuccini. Remove from heat and add the sherry, soy sauce and sour cream. Stir gently to coat without breaking the noodles
Place mixture in a greased, shallow 2 1/2 quart baking dish. Sprinkle evenly with the reserved walnuts and then the cheeses. At this point the casserole can be refrigerated for up to 2 days. Bake until cheese melts and casserole is heated through, about 15 - 20 minutes.
Note: you can bake the mixture in any type or combination of casserole pans you wish. If you use large individual ramekins, bake only until the casserole is hot and the cheese melts, about 10 minutes.
Enjoy!
Enjoy!
Superfood Cereal Recipe

My latest weekday breakfast is what I am calling superfood cereal. It's based on a Canadian cereal I tried at the Winter Fancy Food Show called "Holy Crap." It's made from chia, hemp, buckwheat and some dried fruit and it soaks in milk for 15 minutes before you eat it. It tastes a lot like tapioca pudding with a bit of crunch from the buckwheat, though not quite as sweet as pudding. What's most amazing about it is how little it takes to satisfy. Just a few tablespoons of cereal and a quarter cup of milk and I swear for hours I am not even the slightest bit hungry.
While I don't think this cereal is a cure all, it is very healthy. Chia is a good source of fiber, protein and omega-3 fatty acids, buckwheat is high in the essential amino acids lysine and arginine and hemp seeds are rich in magnesium, potassium, iron, protein and essential omega-3, -6 and -9 fatty acids. I encourage you to change up the proportions to suit your taste. The possibilities are endless, you could switch up the dried fruit, maybe add a little coconut. Holy Crap also includes a bit of cinnamon and dried apples. Some other ideas would be to add shredded apple, flaxseed, vanilla, mashed banana or even juice instead of milk. Have fun and make it yours!
While I don't think this cereal is a cure all, it is very healthy. Chia is a good source of fiber, protein and omega-3 fatty acids, buckwheat is high in the essential amino acids lysine and arginine and hemp seeds are rich in magnesium, potassium, iron, protein and essential omega-3, -6 and -9 fatty acids. I encourage you to change up the proportions to suit your taste. The possibilities are endless, you could switch up the dried fruit, maybe add a little coconut. Holy Crap also includes a bit of cinnamon and dried apples. Some other ideas would be to add shredded apple, flaxseed, vanilla, mashed banana or even juice instead of milk. Have fun and make it yours!
Superfood Cereal
serves 1
Ingredients
1 Tablespoon raw buckwheat groats
1 Tablespoon chia seeds
1 Tablespoon hemp seeds or "hearts"
2 teaspoons dried berries, chopped finely
1/4 cup milk, any kind
Fresh fruit, optional
Fresh fruit, optional
Instructions
Crush the buckwheat groats either in a mortar with a pestle, in a food processor or place them in a heavy plastic bag and smack them with a rolling pin. You want them somewhat crushed, but not into powder. It's easiest to do this with more groats, then just measure out a tablespoon at a time after they are crushed.
Combine the crushed buckwheat, chia, hemp and dried berries in a very small bowl. Add the milk, stir to combine then let sit for 15 minutes to soak before serving. Top with fresh fruit if desired.
Enjoy!
Tag :
gluten-free,
vegetarian
Roasted Corn & Black Bean Salad Recipe

This recipe for Roasted Corn and Black Bean Salad is brought to you by the fresh corn, leftover cotija cheese and a can of beans. And that lazy feeling that strikes during the Summer for something delicious yet easy. Like most everyone, I love fresh corn. Eight ears for 2 dollars? Sold! When corn is sweet it's a cinch to prepare. In addition to adding it to a salad, my other favorite ways to prepare it are making corn chowder (I make a different version just about very time) and on the cob, slathered with mayo and dredged in crumbled cheese served with a wedge of lime.
While corn should be cooked soon after picking or purchasing, cotija cheese is the exact opposite. I bought cotija for some recipe or another and found the leftover cheese lasted and lasted. Like other Mexican cheeses, it's inexpensive, and easy to use. Cotija is a crumbly cheese, less salty than feta, but a little goes a long way. The beans in this recipe make the salad feel hearty and substantial. I suppose you could make it with canned or frozen corn all year round, but it really feels like a Summer dish to me.
While corn should be cooked soon after picking or purchasing, cotija cheese is the exact opposite. I bought cotija for some recipe or another and found the leftover cheese lasted and lasted. Like other Mexican cheeses, it's inexpensive, and easy to use. Cotija is a crumbly cheese, less salty than feta, but a little goes a long way. The beans in this recipe make the salad feel hearty and substantial. I suppose you could make it with canned or frozen corn all year round, but it really feels like a Summer dish to me.
Roasted Corn and Black Bean Salad makes the perfect side dish to go with barbecue chicken, steak, pork chops, you name it. It's a very flexible recipe, you can leave out the cilantro if you like, add more green onions or use red onions instead. Add more tomato or less. Add as much or as little hot sauce as you like. If you don't like spicy food, start with a teaspoon, taste, then add more. I hope you will make this recipe your own!
Roasted Corn & Black Bean Salad
Makes 4 servings
Ingredients
1 teaspoon vegetable oil
3 ears of corn
1 can (15.5 ounces) black beans, drained and rinsed
1 tomato diced, include the juice
1/4 cup chopped fresh cilantro
4 green onions, chopped
1 Tablespoon Habanero Pepper Tabasco Sauce
1 Tablespoon lime juice
1/2 cup crumbled Mexican cotija cheese (or feta)
Salt
Instructions
In a large nonstick skillet, heat oil over medium-high. Strip the corn from the cobs, into the skillet and
cook, stirring, until beginning to brown in spots, about 3 minutes. Transfer to a large bowl and allow to cool for 5 minutes. Stir in black beans, tomato and juice, cilantro, green onions, Habanero sauce and lime juice. Fold in the cotija cheese. Taste for seasonings and add salt if needed.
Enjoy!
Disclaimer: I created this recipe on behalf of Tabasco and I was compensated for it. The choice to post it here, was my own.
Vegetarian Green Chili recipe

Vegetarian green chili was the request for dinner the other night. Chili is very popular at my house. But I rarely make it the same way twice. It might be red or green made with white beans or black beans. I have made it with pork, beef, bison, turkey and chicken, but I like the challenge of creating a truly satisfying vegetarian chili. Somewhere a Texan is not very happy about that.
For this version of vegetarian green chili I knew I wanted to use Green Pepper Tabasco sauce which is made with jalapeños. Fresh jalapeños can vary greatly in heat, but the jalapeño version of Tabasco is always consistent. In addition I used many other green ingredients, some traditional like roasted chiles and tomatillos and one very non-traditional ingredient, spinach. I know that might sound strange, but it's really good. The slightly sour edge of spinach and tomatillos cuts through the starchy sweetness of the white beans. This recipe is a keeper and I know I will be making it again. By they way, when you buy tomatillos, choose the small or medium ones, not the large ones, which can be spongy and almost hollow.
I don't know about you, but I get very carried away when it comes to chili toppings. I usually set out little bowls with sour cream or plain yogurt, shredded cheese (queso fresco this time), chopped green or red onions, chopped cilantro and lime wedges. What do you like to put on top of your chili? Did I miss anything good? With the chili I serve cornbread, tortillas or tortilla chips.
Vegetarian Green Chili
Serves 6
Ingredients
1 pound white beans
1 Tablespoon olive oil
3 garlic cloves, minced
1 onion, chopped
1 teaspoon ground cumin
1 pound tomatillos, husked, rinsed, and coarsely chopped
1 teaspoon kosher salt
1/2 teaspoon sugar
2 cups vegetable broth (or chicken if you prefer)
8 ounces (2 small cans) chopped mild green chiles, drained (such as Hatch or Ortega)
1 cup water
1 cup fresh cilantro leaves and stems, chopped
1 bunch fresh spinach, chopped
1 Tablespoon Green Pepper Tabasco
Instructions
Cook the white beans according to package instructions. Drain and mash about 1 cup of the beans. Set aside.
Heat a large dutch oven over medium heat, when hot, add the oil. Add garlic and onion and cook, stirring often, until golden about 7 - 10 minutes. To the onions add the cumin, give it a stir then add the tomatillos, salt, sugar, broth, green chiles, and water; heat to boiling over high heat. Reduce heat to low and simmer 15 minutes, covered. Stir in beans the beans, cilantro, spinach and Tabasco sauce; simmer until greens are wilted.
Enjoy!
Disclaimer: I created this recipe on behalf of Tabasco and I was compensated for it. The choice to post it here, was my own.
Julia Child's Ratatouille Recipe

Next month will be the celebration of Julia Child's 100th birthday. Her publisher is marking the occasion with Julia Child Restaurant Week, weekly recipe reprints and a charming new book called Bon Appetit: The Delicious Life of Julia Child.
 It's sometimes hard to imagine that Julia Child has been gone for almost eight years. Her statuesque frame, her distinctive high pitched voice and sense of humor are impossible to forget.
Keeping the memory alive and introducing Julia Child to a whole new audience is Bon Appetit: The Delicious Life of Julia Child. It's one of those illustrated children's books that adults will adore. It's filled with joyful images, funny anecdotes and a range of recipes from easy and accessible like Mayonnaise to more advanced like a Gallantine and Bouillabaisse. The colorful images and cheery text manage to entertain and educate in equal measure. I've just seen some sample pages, but I was thoroughly charmed. If you have a budding chef in your family this is a great book to share with them. But any fan of Julia Child will want this too. It's worth it for the tales of Julia Child's childhood pranks and illustrated recipes alone.
I don't know all the details of the Julia Child Restaurant Week August 7-15, but I can point you to the listing of restaurants. Find one in your area, then stay tuned!
As a participant in JC100, I'm very happy to share with you Julia Child's recipe for Ratatouille. I have made this recipe the wrong way for ages. The secret is in cooking each ingredient separately so they retain their own flavor and texture. This recipe came back in fashion thanks to the adorable Pixar film, Ratatouille and Thomas Keller's elegantly revamped recipe (also known as confit byaldi) which featured overlapping layers of vegetables.

Julia Child's Ratatouille
For 6-8 people
1 pound eggplant
1 pound zucchini
1 teaspoon salt
4-6 Tablespoon olive oil, divided
1/2 pound (about 1 1/2 cups) thinly sliced yellow onions
2 sliced green peppers (about 1 cup)
2 cloves mashed garlic
Salt & Pepper to taste
1 pound firm, ripe, red tomatoes, peeled, seeded and juiced (about 1 1/2 cups pulp)
3 Tablespoons minced parsley
Salt and pepper
Peel the eggplant and cut into lengthwise slices 3/8" think, about 3" long and 1" wide. Scrub the zucchini, slice off the two ends and cut into slices about the same size as the eggplant. Place the vegetables in a bowl and toss with 1 tsp. salt. Let stand for 30 minutes. Drain and dry each slice in a towel.
One layer at a time, saute the eggplant and then the zucchini in 4 Tbsp. hot olive oil in a 10-12" skillet for about a minute on each side to brown very lightly. Remove to a side dish.
In the same skillet, cook the onions and peppers (add an additional 2 Tbsp. of olive oil if needed) for about 10 minutes, until tender but not browned. Stir in the garlic and season with salt & pepper to taste.
Slice tomato pulp into 3/8" strips. Lay them over the onions and peppers. Season with salt & pepper. Cover the skillet and cook over low heat for 5 minutes or until tomatoes have begun to render their juice. Uncover, taste the tomatoes with the juices, raise heat and boil for several minutes until juice has almost entirely evaporated.
Place a third of the tomato mixture in the bottom of a 2 1/2 quart casserole (about 2 1/2" deep). Sprinkle 1 Tbsp. fresh, minced parsley over tomatoes. Arrange half of the eggplant and zucchini on top, then half the remaining tomatoes and parsley. Put in the rest of the eggplant and zucchini and finish with the remaining tomatoes and parsley.
Cover the casserole and simmer over low heat for 10 minutes. Uncover, tip the casserole and baste with the rendered juices. Correct seasoning if necessary. Raise heat slightly and cook uncovered about 15 minutes more, basting several times, until juices have evaporated leaving a spoonful or two of flavored olive oil. Be careful of your heat; do not let the vegetables scorch in the bottom of the casserole. Set aside uncovered. Reheat slowly at serving time, or serve cold.
Brussels Sprout & Leek Dumplings Recipe

Do you know the difference between dumplings and ravioli? The secret is the pasta, and it occurred to me when I was creating this recipe. To make ravioli you use pasta dough, which, while silky is still toothsome (al dente). Dumplings can use any kind of dough, including slick wonton skins, which are most definitely not toothsome. Of course there are some exceptions to this rule. I've had some very silky udon noodles lately that use soft, slippery noodles and I've had potstickers which definitely use thicker, chewier dough.
I used to make fresh pasta but I'm too lazy these days, instead I've been experimenting with using wonton wrappers. In the past I used the wrappers to make Afghani leek dumplings called aushak. This time I made dumplings in a similar way, but filled them with a combination of brussels sprouts, leeks, green onions, a bit of garlic and parmesan. Many kinds of ingredients or even leftovers can go in wonton wrappers to make delicious dumplings--meat, cheese, mashed roasted vegetables. Another one of my favorite ways is to fill wonton wrappers is with mashed potatoes. I boil the dumplings and then serve them with butter or sour cream for a quick comforting meal. I even make a simple samosa by mixing mashed potatoes with peas and spices then lightly oiling the dumplings and baking them.
If you haven't tried using wonton wrappers before, or have only used them for making wontons, my advice is, experiment! You can make a filling of your choice then make just one dumpling or two to test and see how you like it. If you make a big batch, freeze them in a single layer on a baking sheet then transfer to a ziplock bag and they'll keep in the freezer for months.
Brussels Sprout & Leek Dumplings42 dumplings
Ingredients
2 teaspoons oil
2 garlic cloves, minced
2 cups leeks, green and white parts, shredded
2 cups brussels sprouts, thinly shredded
2/3 cup, about 4 green onions, thinly shredded
2 Tablespoons Parmesan cheese
Pinch freshly ground nutmeg and black pepper
Wonton wrappers
2 Tablespoons fresh lemon juice
2 Tablespoons extra virgin olive oil
1/4 cup chopped toasted hazelnuts
Parmesan cheese
Instructions
Heat a large non-stick pan and add the oil and garlic. Stir until fragrant, about 30 seconds, then add the leeks, brussels sprouts and green onions. Cooking, stirring occasionally until wilted, about 5-7 minutes. Remove from the stove and allow to cool slightly before mixing in the cheese, nutmeg and pepper. Taste for seasoning and add salt if needed.
To make the dumplings, line up the wrappers, bowl of filling and a small bowl with water. Place a teaspoon of the filling in the center of a wonton wrapper then moisten the edges of the wonton wrapper with water. Fold the wonton wrapper in half diagonally, making sure the ends meet. Press down firmly on the edges to seal.
Meanwhile combine lemon juice and olive oil to drizzle on the finished dumplings. Boil the dumplings in boiling water for a couple of minutes, or until they float to the surface. Drain and serve with the olive oil and lemon juice and a sprinkling of additional cheese and toasted nuts. Note: I reserve a bit of the sauteed vegetables as a garnish as well so guests have a better idea of what is inside each dumpling.
Enjoy!
Mango Cucumber Salad Recipes

Ok here's a crazy idea, one basic salad that can be either sweet or savory. I was trying to think of what to do with some mangoes coming my way from the National Mango Board this week and then I saw a tweet from @SimpleGourmetLA with the idea for a "mojito cucumber, mango and strawberry salad." It occurred to me that both cucumber and mango could go either way--sweet or savory.
I'm always looking for ways to use common ingredients in slightly unexpected ways. Here the twist is using cucumber in a sweet fruit salad and using sweet mango in a savory salad. English cucumber is available year round and does not need to be peeled. It has a very mild flavor and a fine texture without big slippery seeds. Best of all, it has a terrific crunch! I used the most commonly available mango, the Tommy Atkins variety in both salads. It's not a very tropical, luscious or creamy mango, but more of a workhorse, with citrus-like flavor, able and willing to stand up to whatever you demand of it. It's a bit on the firm side so it's particularly good in salads.
For the sweet salad I combined cucumber, mango and strawberries and for the savory version, cucumber, mango and radishes. You might recognize the ingredients from the savory salad as being similar to what you find Mexican street vendors selling. Each salad is flavored with lime, but the sweet salad gets a touch of honey and mint, the savory salad, a pinch of salt and green onion. Both are bursting with juiciness, crunch and Summery flavors and would be great at a picnic. I'd serve the savory salad with grilled fish or chicken. I'd serve the sweet salad with a scoop of sorbet or just a couple of cookies.
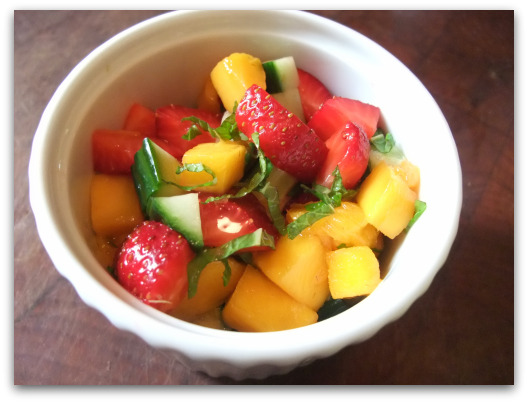
Mango, Cucumber, Strawberry SaladServes 4
Ingredients
1 Tommy Atkins mango, peeled, pitted and cut into chunks
1/2 large English cucumber, cut into chunks
1 pint strawberries, trimmed and cut in chunks
Juice of a fresh lime, squeezed
2 teaspoons honey
2 sprigs chopped fresh mint leaves, about 12 leves
Instructions
In a mixing bowl combine the lime and honey and stir until smooth. Add the mango, cucumber, strawberries and mix. Sprinkle with mint and taste for seasoning before serving.

Mango, Cucumber, Radish Salad
Serves 4
Ingredients
1 Tommy Atkins mango, peeled, pitted and cut into chunks
1/2 large English cucumber, cut into chunks
1 bunch radishes, trimmed and cut into chunks
1 green onion, thinly sliced
Juice of a fresh lime, squeezed
Pinch kosher salt
Instructions
In a mixing bowl combine the lime and salt and stir until dissolved. Add the mango, cucumber, radishes and mix. Sprinkle with green onions and taste for seasoning before serving.
Enjoy!
Roasted Asparagus with Green Garlic & Panko Recipe
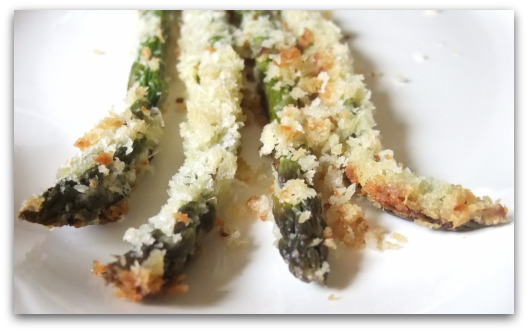
This past Saturday at the Ferry Plaza farmer's market I found lots of harbingers of Spring, all green--asparagus, green garlic, artichokes and even obscure ones like wild radish rapini. I bought a bit of each. The rapini I will blanch then probably toss with dressing or pasta and the artichokes I will surely roast. But I picked up the asparagus and the green garlic without any specific plans.
Green garlic is milder than regular garlic and tastes and looks a bit like large bulbous scallions. There are lots of recipes that use green garlic as an accent in soup, sauces, risotto and pizza. You can chop and saute them the same way you would any other green onion. Because green garlic is in season at the same time as asparagus it is often paired with it and frankly every asparagus and green garlic recipe sounds great to me. Both are springy and green but one more earthy and grassy, the other sweet and oniony.
A typical way to use green garlic is to make a pesto. You can cook it and then puree it or puree it raw. But if you use it raw, it will have a bite! I made a raw pesto and then coated the asparagus with it and then dipped it into panko and roasted it until the panko was golden brown, the asparagus cooked through and the green garlic mellowed and sweet. I was inspired by a number of other recipes to create this one and I'm pleased with the way it turned out. It's good as a side dish with something simple like roast chicken and rice.
The recipe makes way more pesto than you need for a big bunch of asparagus, but use the rest with hot pasta or use it to coat fish or seafood and then top with crumbs or panko. You could also use on toast or dab it on goat cheese. A bit of the pesto would be good swirled in soup as well, especially asparagus soup!
Roasted Asparagus with Green Garlic & Panko
Serves about 4
Ingredients
1/2 cup olive oil
1 Tablespoon fresh lemon juice
1/4 teaspoon kosher salt
1 cup stalks and bulbs green garlic, trimmed and chopped (about 3) remove dark green bits
1 cup panko (Japanese breadcrumbs)
1 bunch medium asparagus spears (about 16 stalks), trimmed, the bottom 1/3 peeled with a vegetable peeler
Instructions
Preheat oven to 450 degrees. Oil a large foil-lined rimmed baking sheet. In a blender or food processor, puree green garlic with olive oil, lemon juice and salt until smooth. Place 1/2 cup panko in a 9x13 baking pan. Place the asparagus on a cutting board or clean surface and rub with about 1/4 cup pesto or enough to coat. Place the asparagus in the baking dish and cover with the remaining panko. Carefully transfer asparagus to prepared baking sheet in a single layer. Roast until browned, about 15 minutes. Serve right away.
Enjoy!


.JPG)


