Tampilkan postingan dengan label gluten-free. Tampilkan semua postingan
Roasted Garlic and Potato Dip Recipe

Roast garlic is sweet and soft and most important, mellow. It won't overpower most dishes like this skordalia inspired dip made with potatoes, extra virgin olive oil, lemon juice and roast garlic, instead of raw. Not only is this dip good for Passover, it's vegetarian (vegan if you use vegan mayo) and gluten free! That is if you use a gluten free mayonnaise, which adds additional creaminess to the dip.
I have been experimenting with "roasting" garlic in the microwave oven, but whatever technique you want to use is fine. The main thing is not to overcook it. It should be soft and creamy but not too darkly caramelized. I use 3-4 cloves, but feel free to use as much as you like. Serve it with fresh vegetables for dipping.
Roasted Garlic and Potato Dip
1 russet potato
4 cloves roasted garlic (use any method you like)
1/4 cup extra virgin olive oil
3 Tablespoons mayonnaise
1 teaspoon freshly squeezed lemon juice
Water
Salt
Bake or microwave the potato until thoroughly cooked. You are not going to use the skin so however you prefer to cook it is fine. When cool enough to handle, slice open and scoop the potato out of the skin. Place the potato in a bowl with the garlic cloves and mash. Mix in the olive oil, mayonnaise and lemon juice. Add enough water to make a thick dip. Season to taste with salt.
Enjoy!
Beet Almond Dip Recipe

I'm in the midst of creating 101 recipes for a new cookbook (it was announced March 3rd). As a result, I haven't been cooking anything other than recipes for the book. But Passover is coming up and I've been asked to bring appetizers to the seder dinner. Appetizers for Passover are a bit tricky. If the meal is meat, which is typical, then you can't use any dairy. In addition you can't use legumes, seeds and most grains. So that means things like hummus and baba ghahoush are out so are cheeses and dairy based dips. What's left? Vegetables and nuts. Also eggs and meat (chopped liver is typical).
Recently I received some samples of Melissa's Organic Baby Beets, peeled and steamed and ready to eat. These cooked beets are great for salads but I decided to try use them to make a dip. Instead of tahini, I used blanched almonds. Beets and almonds are really nice together. But they are both sweet, so I added ginger and lemon to cut the sweetness. It also needs plenty of salt.
You can serve this dip with chips or fresh vegetables. It's creamy and smooth and even though I felt like I was cheating on my Vitamix, I did test it in my ancient Cuisinart food processor and got great results. I am thinking about making another dip using roasted carrots and almonds. What do you think?
Beet Almond Dip
Ingredients
1/4 cup blanched almonds
2 Tablespoons water
1 cup sliced cooked beets
1 Tablespoon freshly squeezed lemon juice
1 Tablespoon extra virgin olive oil
1/8 teaspoon ground ginger
Salt
Instructions
Process the almonds and water in the food processor for a minute or so, until white and creamy but not completely smooth. Add the beets and process, scraping down the sides from time to time. Finally add the lemon juice and olive oil and ginger. Season to taste with salt.
Enjoy!
Disclaimer: My thanks to Melissa's for providing me with the beets
Warm Cauliflower Dip Recipe
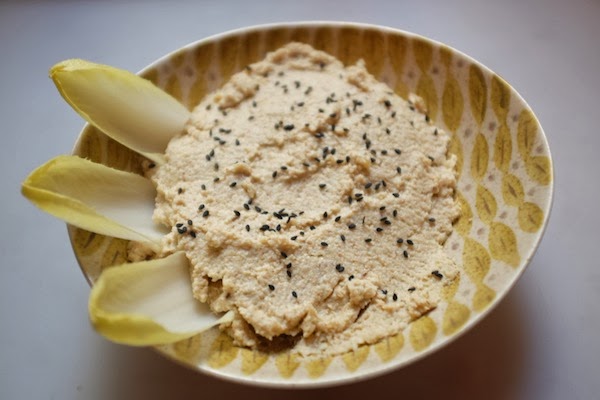
Tahini is a very rich sesame seed paste used in hummus. But that's not the only thing you can do with tahini. It adds richness and creaminess to a variety of dishes including salads, fish, grilled meats and vegetables. To make an amazing tahini sauce, all you have to do is combine tahini, mashed garlic, water and lemon juice. You can make it to be thick and creamy or thin and saucy. Either way it is delicious.
Recently I needed to make some appetizers that were lactose free. I looked in my fridge and found a head of cauliflower and some tahini (which is a staple ingredient at my house) and those formed the basis of this luscious warm cauliflower dip. No butter, no cheese. No problem!
Warm cauliflower dip is vegan, vegetarian, gluten free and lactose free. So pretty much anyone should be able to enjoy it. It's surprisingly rich and creamy, considering it doesn't have any cream. I made it the first time in my Vitamix, but I tested it in the food processor and it came out just great that way too. You could add hot sauce or a splash of lemon juice if you want to customize it. You could also use it as a spread for sandwiches or wraps. It's good at room temperature or warm.
Warm Cauliflower Dip
Ingredients
1 head cauliflower
Head of garlic
Olive oil
2 Tablespoons tahini
2-3 Tablespoons water
1 teaspoon kosher salt
3/4 teaspoon ground cumin
Black sesame seeds, optional
Instructions
Heat the oven to 400 degrees. Slice about 1/4 inch off the top of the garlic clove, just enough to expose the cloves. Cut away the core of the cauliflower and break it into small pieces. Place the cauliflower and whole head of garlic on a rimmed baking sheet (I line mine with parchment paper or foil for easy clean up). Drizzle the vegetables with a little oil, about a tablespoon or so. Roast for 45 minutes or until tender and beginning to brown in spots.
Transfer the cauliflower to the food processor. When the garlic is cooled enough to handle, squeeze it from the skins and add as much of it as you'd like into the food processor. I use about 5 cloves (save the rest to add to mashed potatoes). Add the tahini, salt and cumin. Puree, adding as much water as you need to form a very thick and creamy dip. Taste for seasonings. You may need to add more salt or tahini, it really depends on the size and flavor of the cauliflower. Garnish with black sesame seeds. Serve with crudités, endive leaves or chips. You can keep this in the refrigerator for several days and gently reheat in the microwave (or serve at room temperature).
Head of garlic
Olive oil
2 Tablespoons tahini
2-3 Tablespoons water
1 teaspoon kosher salt
3/4 teaspoon ground cumin
Black sesame seeds, optional
Heat the oven to 400 degrees. Slice about 1/4 inch off the top of the garlic clove, just enough to expose the cloves. Cut away the core of the cauliflower and break it into small pieces. Place the cauliflower and whole head of garlic on a rimmed baking sheet (I line mine with parchment paper or foil for easy clean up). Drizzle the vegetables with a little oil, about a tablespoon or so. Roast for 45 minutes or until tender and beginning to brown in spots.
Transfer the cauliflower to the food processor. When the garlic is cooled enough to handle, squeeze it from the skins and add as much of it as you'd like into the food processor. I use about 5 cloves (save the rest to add to mashed potatoes). Add the tahini, salt and cumin. Puree, adding as much water as you need to form a very thick and creamy dip. Taste for seasonings. You may need to add more salt or tahini, it really depends on the size and flavor of the cauliflower. Garnish with black sesame seeds. Serve with crudités, endive leaves or chips. You can keep this in the refrigerator for several days and gently reheat in the microwave (or serve at room temperature).
Enjoy!
Chestnut and Celery Root Soup Recipe

My CSA or community supported agriculture box of produce from Eatwell Farms challenges me with every delivery this season. Bok choy? Cabbage? Celery root? Sure I have a recipe or two for each of those, but week after week and I get bored and need to find something new. As much as I love celery root salad and mash I think I've discovered a recipe I like even better, Chestnut and Celery Root Soup. It would be perfect to serve on Christmas or on New Year's Eve.
This is the epitome of a shortcut recipe with few ingredients and a reliance on a couple of convenience items namely roasted, peeled and vacuum packed chestnuts I find at Trader Joe's and canned chicken broth. I've mentioned it before, but when I don't have homemade chicken broth, I find Swanson's to be the next best thing. The prep for this soup takes more time than the cooking and it's just a matter of peeling, slicing and dicing onions, celery root and an apple pear.
Chestnut and Celery Root Soup is really very elegant and rich despite the fact that it has no cream in it. I took my inspiration from a Daniel Boulud recipe I found on Dorie Greenspan's blog, In the Kitchen and on the Road with Dorie Greenspan. That recipe is much more of a chef recipe than mine, but trust me, mine is delicious! It has lots of depth and a nice balance of sweetness and earthy flavors.
Chestnut and Celery Root Soup
Makes 4 servings
Ingredients
1 Tablespoon unsalted butter
1 Tablespoon oil
1 small onion, peeled and sliced thinly
1 apple pear (you could use an apple or a pear if you prefer), peeled and diced
1 celery root, peeled and diced
1 14.5 ounce can chicken broth or homemade
1/2 cup cooked and peeled chestnuts
1/2 teaspoon kosher salt
Nutmeg
Cream or sour cream, optional for garnish
Instructions
Heat the butter and oil in a saucepan. When the butter melts, add the onion. Cook gently for 5 minutes or until soft, then ad the pear and celery root and cook for another 5 minutes. Add the chicken broth, then fill the can with water and add that as well. Simmer the soup for 10 minutes or until the celery root is very tender.
Add the chestnuts to the soup and puree in the blender in batches until creamy. Season with salt and add a pinch of freshly ground nutmeg. Serve with a swirl of sour cream or cream and a few bits of chestnut if desired.
Enjoy!
Rice Paper Salad Rolls Recipe

Rice paper is traditionally used to make Vietnamese "Summer rolls" but like tortillas, it's extremely versatile and shouldn't be limited to only Vietnamese cuisine. Use it as a wrapper for pretty much whatever you like and you've got a great appetizer, snack or meal. While tortillas are served warm, rice paper rolls are served at room temperature.
I believe eating outdoors is more fun than eating inside, and that eating with your fingers makes everything taste better. So that makes rice paper salad rolls perfect for picnics (or take from home lunches). I have used all kinds of different fillings and this is a combination I really like, but experiment! Try sprouts, shredded chicken, smoked salmon, enoki mushrooms--the possibilities are endless.
Rice Paper Salad Rolls
Makes 2 rolls
Ingredients
4 sheets rice paper
1 English cucumber, peeled
1 small carrot
1 daikon radish
Avocado
Avocado
1 piece marinated or baked tofu, (or use homemade gluten free baked tofu)
4 lettuce leaves
Instructions
Prepare the vegetables by peeling long lengthwise strips of each the cucumber, daikon radish and carrot using a vegetable peeler. The number of slices will vary depending upon the size of the rice paper you have. Then slice each strip into long skinny slivers. Cut the tofu and avocado into thin strips.
Fill a bowl with warm water. Dip two rice paper sheets into the water, making sure the water flows between the sheets. Let the water drip off the rice paper, and then lay it on a flat surface. You want the sheets to be just softened enough so you can roll them.
Lay one lettuce leaf on the double layer of rice paper. Top with thin strips of vegetables and tofu, but don't overstuff. Roll up like a burrito, either tucking the ends in or leaving them open. Serve with peanut sauce
Enjoy!
Passover Spinach Ricotta Gnudi

Spinach ricotta gnudi, made with no wheat flour, are my latest recipe, just in time for Passover. This week marks the beginning of the Jewish holiday celebrating the Israelites liberation from Egypt and also Spring, rebirth, renewal, freedom, belonging, ...you get the picture. Since the Israelites had to flee their oppressors quickly they didn't have time to allow bread to rise, so the story goes. To commemorate that time, during Passover Jews eat foods made with matzo meal or matzo cake meal, but not with regular flour. Most other non-wheat flours are also not allowed.
Gnudi are a little larger and plumper than gnocchi but somewhat similar. Some people think of them as "ravioli without the pasta." This recipe is very easy because you use one of those "blocks" of frozen spinach. The secret is getting as much water as possible out of the spinach. You want the dough to be very stiff. Rolling the dumplings in potato starch also helps keep them from falling apart in the water when you boil them. Since I used potato starch instead of flour, these gnudi are also gluten free. I adapted my recipe from the Weelicious recipe for Spinach Gnocchi.
Gnudi are a little larger and plumper than gnocchi but somewhat similar. Some people think of them as "ravioli without the pasta." This recipe is very easy because you use one of those "blocks" of frozen spinach. The secret is getting as much water as possible out of the spinach. You want the dough to be very stiff. Rolling the dumplings in potato starch also helps keep them from falling apart in the water when you boil them. Since I used potato starch instead of flour, these gnudi are also gluten free. I adapted my recipe from the Weelicious recipe for Spinach Gnocchi.
The dumplings are primarily made from ricotta and parmesan cheese, so they are very rich. I like them served simply with brown butter and sage, but you could also serve them with tomato sauce if you prefer, but do cook them in butter before adding sauce. When you brown them they get slightly crisp on the outside, without browning they can seem a little gummy.
Passover Spinach Ricotta Dumplings
Serves 4, makes about 35 small dumplings
Ingredients
10 ounces frozen chopped spinach
1 cup skim milk ricotta cheese
2/3 cup parmesan cheese
1 egg yolk
Pinch fresh grated nutmeg
5 Tablespoons potato starch, divided
1/4 cup unsalted butter
12 fresh sage leaves
3-4 Tablespoons parmesan cheese
Instructions
Cook the spinach according to instructions, let cool then squeeze all the water out of it as possible using your hands and a colander.
Combine the spinach, ricotta, parmesan cheese, egg yolk, nutmeg and 2 tablespoons potato starch in a medium bowl. Mix until all ingredients are fully incorporated. Use a teaspoon to portion lumps of dough, and roll into balls. Place on a rimmed sheet pan. When all dough is rolled, dust the dumplings with the remaining 3 tablespoons of potato starch and roll them until they are coated on all sides.
Boil a pot of water and add a pinch of salt. Gently place the dumplings in the water and simmer them until they rise to the surface, about 3-4 minutes. Remove with a slotted spoon, and place on a plate.
Heat a skillet over medium heat, add the butter. When the butter is melted, add the sage leaves and the drained dumpling. Cook, rolling to brown lightly. Sprinkle with parmesan cheese before serving.
Superfood Cereal Recipe

My latest weekday breakfast is what I am calling superfood cereal. It's based on a Canadian cereal I tried at the Winter Fancy Food Show called "Holy Crap." It's made from chia, hemp, buckwheat and some dried fruit and it soaks in milk for 15 minutes before you eat it. It tastes a lot like tapioca pudding with a bit of crunch from the buckwheat, though not quite as sweet as pudding. What's most amazing about it is how little it takes to satisfy. Just a few tablespoons of cereal and a quarter cup of milk and I swear for hours I am not even the slightest bit hungry.
While I don't think this cereal is a cure all, it is very healthy. Chia is a good source of fiber, protein and omega-3 fatty acids, buckwheat is high in the essential amino acids lysine and arginine and hemp seeds are rich in magnesium, potassium, iron, protein and essential omega-3, -6 and -9 fatty acids. I encourage you to change up the proportions to suit your taste. The possibilities are endless, you could switch up the dried fruit, maybe add a little coconut. Holy Crap also includes a bit of cinnamon and dried apples. Some other ideas would be to add shredded apple, flaxseed, vanilla, mashed banana or even juice instead of milk. Have fun and make it yours!
While I don't think this cereal is a cure all, it is very healthy. Chia is a good source of fiber, protein and omega-3 fatty acids, buckwheat is high in the essential amino acids lysine and arginine and hemp seeds are rich in magnesium, potassium, iron, protein and essential omega-3, -6 and -9 fatty acids. I encourage you to change up the proportions to suit your taste. The possibilities are endless, you could switch up the dried fruit, maybe add a little coconut. Holy Crap also includes a bit of cinnamon and dried apples. Some other ideas would be to add shredded apple, flaxseed, vanilla, mashed banana or even juice instead of milk. Have fun and make it yours!
Superfood Cereal
serves 1
Ingredients
1 Tablespoon raw buckwheat groats
1 Tablespoon chia seeds
1 Tablespoon hemp seeds or "hearts"
2 teaspoons dried berries, chopped finely
1/4 cup milk, any kind
Fresh fruit, optional
Fresh fruit, optional
Instructions
Crush the buckwheat groats either in a mortar with a pestle, in a food processor or place them in a heavy plastic bag and smack them with a rolling pin. You want them somewhat crushed, but not into powder. It's easiest to do this with more groats, then just measure out a tablespoon at a time after they are crushed.
Combine the crushed buckwheat, chia, hemp and dried berries in a very small bowl. Add the milk, stir to combine then let sit for 15 minutes to soak before serving. Top with fresh fruit if desired.
Enjoy!
Tag :
gluten-free,
vegetarian
Easy Almond Cookies Recipe

I was recently sent some almonds from the Almond Board and I was looking for a good way to use them. There are lots of similar recipes to this one, but the comments on Epicurious led me to make a crucial change in the recipe. I cut the sugar in half. I also made slightly larger cookies than the recipe calls for and skipped dusting them in confectioners sugar. It might seem odd to add almond extract to almond cookies, but without it they can be a little bland. Because they are such dense little bites, they won't crumble making them good for travel or shipping. They are gluten free and have no added oil or butter.
While no one eats cookies for health purposes, these are pretty healthy. Lots of research has been done on almonds and they are a true nutritional powerhouse very high in manganese, vitamin E and magnesium and eating them lowers cholesterol and reduces the risk of heart attack. So eat them in good health!
Easy Almond Cookies
Makes 14 cookies, but recipe can easily be multiplied
adapted from a recipe published in Gourmet magazine, 1997
Ingredients
1 cup blanched almonds, whole or slivered
1/3 cup sugar
Pinch salt
1 egg white
1/4 teaspoon almond extract
14 whole almonds
Instructions
Preheat oven to 350 degrees. In a food processor combine the almonds, sugar and salt. Process until very finely ground. Add the egg white and almond extract and pulse until the dough comes together. Roll the dough into 14 evenly sized balls, and place on a parchment lined cookie sheet. Press one almond into the center of each cookie, pressing down slightly.
Bake for 10 minutes or until just starting to show a hint of gold. Let cookies cool on the pan, then transfer to an airtight container.
Enjoy!
Roasted Corn & Black Bean Salad Recipe

This recipe for Roasted Corn and Black Bean Salad is brought to you by the fresh corn, leftover cotija cheese and a can of beans. And that lazy feeling that strikes during the Summer for something delicious yet easy. Like most everyone, I love fresh corn. Eight ears for 2 dollars? Sold! When corn is sweet it's a cinch to prepare. In addition to adding it to a salad, my other favorite ways to prepare it are making corn chowder (I make a different version just about very time) and on the cob, slathered with mayo and dredged in crumbled cheese served with a wedge of lime.
While corn should be cooked soon after picking or purchasing, cotija cheese is the exact opposite. I bought cotija for some recipe or another and found the leftover cheese lasted and lasted. Like other Mexican cheeses, it's inexpensive, and easy to use. Cotija is a crumbly cheese, less salty than feta, but a little goes a long way. The beans in this recipe make the salad feel hearty and substantial. I suppose you could make it with canned or frozen corn all year round, but it really feels like a Summer dish to me.
While corn should be cooked soon after picking or purchasing, cotija cheese is the exact opposite. I bought cotija for some recipe or another and found the leftover cheese lasted and lasted. Like other Mexican cheeses, it's inexpensive, and easy to use. Cotija is a crumbly cheese, less salty than feta, but a little goes a long way. The beans in this recipe make the salad feel hearty and substantial. I suppose you could make it with canned or frozen corn all year round, but it really feels like a Summer dish to me.
Roasted Corn and Black Bean Salad makes the perfect side dish to go with barbecue chicken, steak, pork chops, you name it. It's a very flexible recipe, you can leave out the cilantro if you like, add more green onions or use red onions instead. Add more tomato or less. Add as much or as little hot sauce as you like. If you don't like spicy food, start with a teaspoon, taste, then add more. I hope you will make this recipe your own!
Roasted Corn & Black Bean Salad
Makes 4 servings
Ingredients
1 teaspoon vegetable oil
3 ears of corn
1 can (15.5 ounces) black beans, drained and rinsed
1 tomato diced, include the juice
1/4 cup chopped fresh cilantro
4 green onions, chopped
1 Tablespoon Habanero Pepper Tabasco Sauce
1 Tablespoon lime juice
1/2 cup crumbled Mexican cotija cheese (or feta)
Salt
Instructions
In a large nonstick skillet, heat oil over medium-high. Strip the corn from the cobs, into the skillet and
cook, stirring, until beginning to brown in spots, about 3 minutes. Transfer to a large bowl and allow to cool for 5 minutes. Stir in black beans, tomato and juice, cilantro, green onions, Habanero sauce and lime juice. Fold in the cotija cheese. Taste for seasonings and add salt if needed.
Enjoy!
Disclaimer: I created this recipe on behalf of Tabasco and I was compensated for it. The choice to post it here, was my own.
Vegetarian Green Chili recipe

Vegetarian green chili was the request for dinner the other night. Chili is very popular at my house. But I rarely make it the same way twice. It might be red or green made with white beans or black beans. I have made it with pork, beef, bison, turkey and chicken, but I like the challenge of creating a truly satisfying vegetarian chili. Somewhere a Texan is not very happy about that.
For this version of vegetarian green chili I knew I wanted to use Green Pepper Tabasco sauce which is made with jalapeños. Fresh jalapeños can vary greatly in heat, but the jalapeño version of Tabasco is always consistent. In addition I used many other green ingredients, some traditional like roasted chiles and tomatillos and one very non-traditional ingredient, spinach. I know that might sound strange, but it's really good. The slightly sour edge of spinach and tomatillos cuts through the starchy sweetness of the white beans. This recipe is a keeper and I know I will be making it again. By they way, when you buy tomatillos, choose the small or medium ones, not the large ones, which can be spongy and almost hollow.
I don't know about you, but I get very carried away when it comes to chili toppings. I usually set out little bowls with sour cream or plain yogurt, shredded cheese (queso fresco this time), chopped green or red onions, chopped cilantro and lime wedges. What do you like to put on top of your chili? Did I miss anything good? With the chili I serve cornbread, tortillas or tortilla chips.
Vegetarian Green Chili
Serves 6
Ingredients
1 pound white beans
1 Tablespoon olive oil
3 garlic cloves, minced
1 onion, chopped
1 teaspoon ground cumin
1 pound tomatillos, husked, rinsed, and coarsely chopped
1 teaspoon kosher salt
1/2 teaspoon sugar
2 cups vegetable broth (or chicken if you prefer)
8 ounces (2 small cans) chopped mild green chiles, drained (such as Hatch or Ortega)
1 cup water
1 cup fresh cilantro leaves and stems, chopped
1 bunch fresh spinach, chopped
1 Tablespoon Green Pepper Tabasco
Instructions
Cook the white beans according to package instructions. Drain and mash about 1 cup of the beans. Set aside.
Heat a large dutch oven over medium heat, when hot, add the oil. Add garlic and onion and cook, stirring often, until golden about 7 - 10 minutes. To the onions add the cumin, give it a stir then add the tomatillos, salt, sugar, broth, green chiles, and water; heat to boiling over high heat. Reduce heat to low and simmer 15 minutes, covered. Stir in beans the beans, cilantro, spinach and Tabasco sauce; simmer until greens are wilted.
Enjoy!
Disclaimer: I created this recipe on behalf of Tabasco and I was compensated for it. The choice to post it here, was my own.
Bison Tacos with Avocado & Radish

American bison are an important part of the prairie ecosystem and after a decline almost to extinction around the end of the 19th century, today there are many ranchers working hard to bring them back. I enjoy cooking and eating bison (sometimes referred to as buffalo). The brands I've tried thus far have all been grass fed, lean, raised in a more sustainable manner and well, delicious. You may be able to find ground bison at your supermarket and it's pretty easy to use in recipes that call for ground beef. Bison steaks however are another story.
Because most bison is grass fed, it's leaner, like grass fed beef. Considered a highly nutrient dense food, it's lower in calories, fat and cholesterol than even chicken, it has 40% more protein than beef and is high in iron, omega 3 fatty acids and vitamin E. Without rich marbling, it needs more tender loving care. Wild Idea Buffalo recently sent me some samples of their products. Their ranch is located in South Dakota between the Black Hills and the Badlands National Park and their herd is raised without the use of antibiotics or hormones. I knew immediately what I wanted to try with the New York strip loin steak. An extremely lean piece of meat, I knew I would cook it quickly, searing to get some nice color and flavor, and serving it very rare. Because it is so lean, it's particularly good paired with something rich, like avocado.
I got my inspiration from a Martha Stewart recipe, Beef Tacos with Avocado and Radish Salsa. My adaptation is very close to the original. Here's what I did differently. I used bison instead of beef and I used a lot less of it! I rubbed the steak with oil and just sprinkled it with both cumin and chile powder. I used fresh jalapenos instead of picked ones and I added scallions. Most importantly I made my own tortillas. Please, do yourself a favor. Buy a tortilla press
and a big bag of masa harina (Maseca is a good and easy to work with brand) and never settle for store bought tortillas ever again.

Bison Tacos with Avocado and Radish (adapted from Everyday Food, Martha Stewart)
Makes 6 tacos
Ingredients
10 ounces bison strip loin steak
vegetable oil
chile powder
ground cumin
1 avocado, pitted, peeled and diced
4 radishes, diced
2 green onions, sliced
2-3 tablespoons cilantro
1 jalapeno pepper, diced, more or less as desired
2 limes
pinch salt
6 small corn tortillas, preferably homemade
Instructions
Allow the steak to come to room temperature. Pat it dry with paper towels then rub it with a just enough vegetable oil so it is glossy, but not slick. Sprinkle all sides with chile powder and ground cumin. Heat a cast iron skillet. Sear the meat 3 minutes on the top and bottom and then another 2-3 minutes on the other two sides (loin is almost square shaped). Allow to cool 10 minutes then slice thinly.
Make salsa by combining the diced avocado, radishes, green onions, cilantro and jalapeno. Slice the limes in half and squeeze them over the salsa, sprinkle with a pinch of salt, gently mix then taste. Adjust seasoning as you see fit. Heat the tortillas, top with slices of steak and salsa.
Enjoy!
If you are interested in trying bison, you can receive a 20% discount by using the code Amy-Buffalo20 at Wild Idea Buffalo Store through July 1st, 2012.
My thanks to Wild Idea Buffalo for sending me samples of their products to try.
Hot Chocolate Cookies Recipe

I made François Payard Flourless Chocolate-Walnut Cookies twice during Passover this year and they were gobbled up so quickly that I didn't even get to snap a photo. After following the recipe closely, I decided to put my own twist on it. The cookies are mostly powdered sugar, cocoa powder and egg whites. They are crisp and crackly on the outside but moist and fudgy, almost like brownies on the inside. But perhaps not surprisingly, they are a bit sweet.
To temper the sweetness I added Tabasco and cacao nibs. The Tabasco gives just a hint of heat in the background. You'll barely notice it, but it definitely takes these cookies to the next level. While the toasted walnuts add crunch and a contrasting bitterness, unsweetened cacao nibs help to balance the sweetness even more. Though I wouldn't call these cookies spicy, they do remind me of hot chocolate. The original recipes calls for Dutch process cocoa, but I tested it with natural cocoa (Hershey's and Valrhona) and it worked fine. I make the cookies smaller than Payard does because I'd rather have two cookies than one, but feel free to make them whatever size you like best. You can also make a half batch.
Hot Chocolate Cookies (adapted from François Payard)
makes about 40
Ingredients
2 cups walnut halves
3 cups confectioners’ sugar
1/2 cup + 3 tablespoons unsweetened cocoa powder (Dutch-process or natural)
1/4 teaspoon salt
4 egg whites
2 teaspoons vanilla extract
2 teaspoons Tabasco sauce
2/3 cup cacao nibs
Instructions
Preheat oven to 320 degrees. Chop the walnut roughly, place on a parchment lined, rimmed baking sheet and toast in the oven for 7-10 minutes, just until they are golden and fragrant. Let walnuts cool slightly. In a large bowl, whisk the confectioners’ sugar with the cocoa powder and salt. Add the egg whites, vanilla and Tabasco and stir just until the batter is moistened (do not overbeat). Fold in the walnuts and cacao nibs using a spatula. Spoon a heaping teaspoon of batter onto the baking sheets (or make them as large as a tablespoon if you prefer) and bake for 15 minutes, until the tops are glossy and lightly cracked. Let cookies cool then peel off the parchment paper.
Enjoy!
Disclaimer: I created this recipe on behalf of Tabasco and I was compensated for it. The choice to post it here, was my own.
Grapefruit Radicchio Salad Recipe

As part of my resolution to eat more salad, I am trying to buy ingredients that can be turned into a salad without too much fuss. You practically need to buy tender salad greens every day so I've been buying crunchy vegetables and hardier leafy greens instead. On my shopping lists these days are daikon radish, carrots, celery, fennel and red radishes. Shaved thin, they all are great salad fixings. I also buy avocados, and some citrus fruit to gussy up my salads.
I made this particular salad one night when I wasn't hungry enough for dinner and I had very little in the house to cook anyway. I loved it so much that I keep going back to the store to buy the same ingredients so I can make it again! It's based on my very faulty recollection of the Grapefruit Jicama Salad from the Slanted Door.
I particularly like the combination of Napa cabbage and radicchio. They are sturdy crunchy greens, (ok, technically not green at all!) but less hardy than red or green cabbage. I used O Clementine olive oil. It's just lovely, but any citrus infused olive oil would be fine if you have some on hand, otherwise use any extra virgin olive oil you like. The salad also includes candied pecans. I have made candied pecans hundreds of times and this is the easiest method of all.
Grapefruit Radicchio Salad Serves 2 as an entree or 4 as a starter
Ingredients
2 cups radicchio, shredded
1 cup Napa cabbage, shredded
1 grapefruit
1/4 cup pecans, chopped
2 teaspoons sugar
1/8 teaspoon smoked paprika
2 Tablespoons extra virgin olive oil or citrus flavored olive oil
1 teaspoon white wine vinegar
Instructions
In a small frying pan combine the pecans with the sugar and a teaspoon of water, cook over medium-high heat, stirring constantly. When the sugar gets very brown take the pan off the heat and sprinkle the nuts with a pinch of salt and the smoked paprika, stir and let cool in the pan, making sure the nuts are separated from each other so they don't clump together.
Toss the radicchio and cabbage in a bowl. Peel the grapefruit using a knife to remove all the pith. Cut between the membranes to remove only the segments and drop them into the bowl with the salad. Using your hands, squeeze the remaining juice out of the grapefruit membranes and core, onto the salad. Add the olive oil and vinegar and toss. Top with the cooled candied pecans. Serve immediately.
Enjoy!
Citrus Quinoa Salad with Toasted Almonds Recipe

The most challenging thing about quinoa is learning how to pronounce it, "keen-wah." After that, it's smooth sailing. A super healthy Peruvian "grain," quinoa is as delicious as it is healthy. While quinoa tastes and cooks as if it were a grain, it's actually a seed and has a light, mild flavor and somewhat chewy and creamy texture. It does a wonderful job of absorbing the flavors in dressings or vinaigrettes. Think of it as a healthier version of couscous that you can serve hot, at room temperature or cold.
I used to visit a shop on Grant Avenue in North Beach that had lots of vintage ephemera. The postcard that said "California, land of fruits and nuts" always cracked me up. Fruits and nuts. You have no idea. California is such a magnet for weirdos, and I mean that in a good way. As an agricultural state, we also happen to have lots of actual fruits and nuts. We are the top agriculture state, and the nation’s sole producer (99 percent or more) of a large number of specialty crops, including almonds, artichokes, dates, figs, grapes, raisins, pistachios, clingstone peaches, dried plums, sweet rice, pomegranates and walnuts, according to the California Department of Food and Agriculture.
I used the sunny California combination of almonds and tangerines in this salad, but you could use segments of navel orange, clementines or any other sweet citrus fruit. This salad is good at room temperature. It would make a perfect accompaniment to grilled fish or roast chicken, but it would also be a good potluck dish. You could go even more "California" and serve it piled high in an avocado half. It will keep for a day or so, but it best eaten soon after you make it.
Note:This recipe calls for the juice and zest of half a lemon. Zest the lemon while it's still whole, then cut it in half and juice it.
Citrus Quinoa Salad with Toasted AlmondsServes 4
Ingredients
1 tangerine, peeled, seeded and cut into chunks (remove as much of the membranes as you can)
1 cup white quinoa, rinsed well
1/2 lemon, preferably organic
2 Tablespoons extra virgin olive oil
2 medium scallions, thinly sliced
1 Tablespoon flat leaf parsley, minced
1/4 teaspoon sriracha, or more to taste
2 Tablespoons thinly sliced toasted almonds
Instructions
Rinse the quinoa thoroughly, then toast it in a dry pan over medium heat for a few minutes until it is fragrant.
In a medium saucepan, bring 1 3/4 cups water, the quinoa, and 1/2 tsp. salt to a boil over high heat. Cover, reduce the heat to medium, and simmer until the water is absorbed and the quinoa is translucent and tender, 10 to 15 minutes. Spread out the quinoa on a baking sheet to cool to room temperature.
Finely grate the zest from the lemon and then squeeze the juice into a mixing bowl. Add the olive oil, scallions, parsley and sriracha. Fold in the quinoa and tangerine pieces, season to taste with salt and top with almonds just before serving.
Enjoy!
More fruity quinoa salads
Quinoa Salad with Pears, Baby Spinach & Chickpeas and Maple Vinaigrette from Gluten Free Goddess
Quinoa Salad with Grapes from the Kitchn
Pineapple Quinoa Salad with With Sweet Curry Vinaigrette from Poor Girl Eats Well
Quinoa Salad with Mango & Herb Marinated Shrimp from Well Fed


.JPG)


